
Showing posts with label craft. Show all posts
Showing posts with label craft. Show all posts
Wednesday, November 10, 2010
Sunday, November 7, 2010
Holiday Post Cards

So...who said that holiday greeting cards have to be the same old standard thing? This year I am sending out Post Cards! Yes, you read it correctly...Post Cards!
Before taking the plunge to do something totally different, I went onto all of my favorite photo web sites and scoped out how much it would cost to order a bundle of greeting cards personalized with a message and photos. Some cards run $1.25 a piece! I thought there has to be a better way! So I visited my loyal vistaprint.com and ordered 100 personalized postcards for $24.99. I uploaded my own design, which added another $4.99 plus shipping, which was about $6.99, totaling under $40.00 for 100 cards! That's 40 cents per greeting!
Click on this link to directly take you to the Post Card page of Vistaprint: http://www.vistaprint.com/postcards.aspx?xnav=LeftItem&xnid=AdvertisingMarketing_Postcards&dng=1986090&rd=2
The benefits of sending out Post Cards this holiday...
•Saving money on the actual holiday greeting (40 cents per greeting!)
•Saving money on postage (postcard stamps only cost 28 cents for the average sized post card.)
•Being able to write a personalized message by hand to the recipient on the backside! (I think this adds such a nice, personal touch!)
If you are design savvy and have programs such as Photoshop or Illustrator, you can download a Post Card template off of the vistaprint web site, which has guidelines for designing your own. If you are not design savvy, you can choose from a variety of holiday designs and type whatever you wish in the text boxes on the front of the cards.
The attached image above is a preview of what we are sending out this year so those of you on my "nice list" are getting a sneak peak of what you will be receiving in the mail come December! I hope I didn't spoil it for you but I couldn't keep this great money saving idea a secret!
BE INSPIRED!
Friday, November 5, 2010
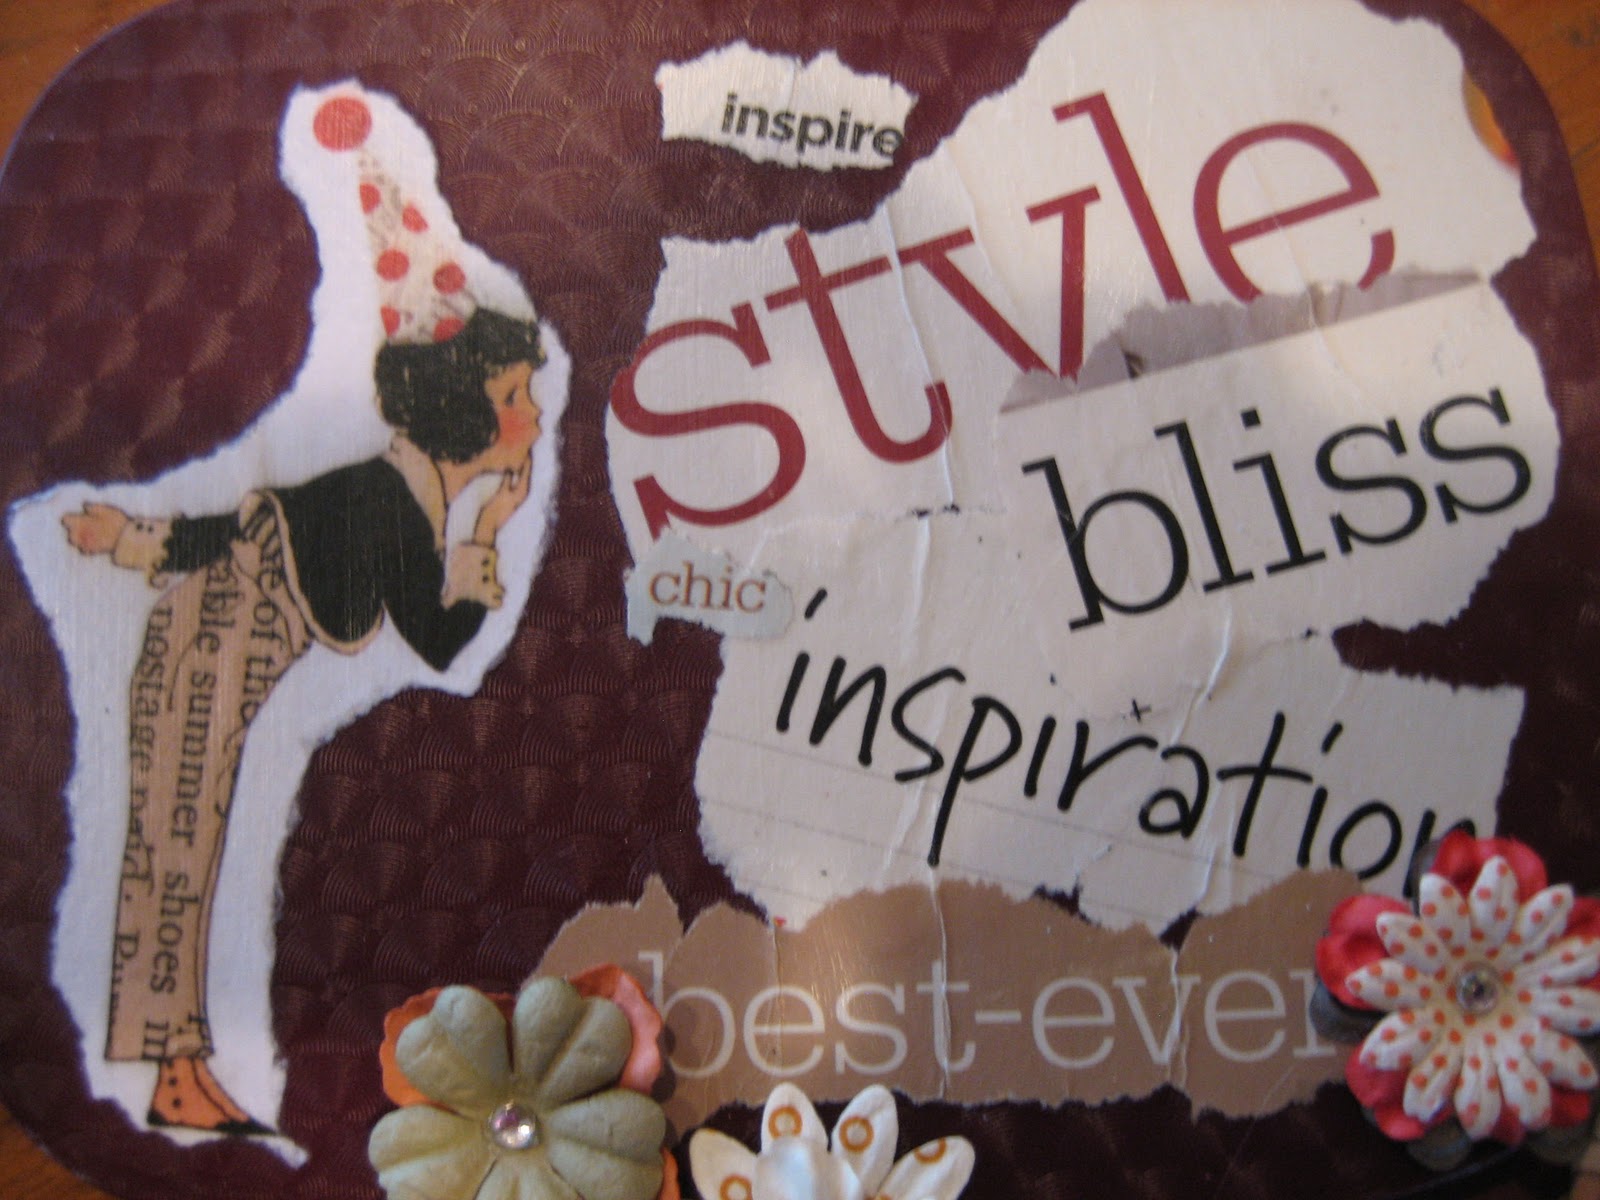
Decoupaged Hand Mirrors-Thrifty Gifty #3
 |
| Detail of Hand Mirror |

 |
| Thrifty Gifty Hand Mirrors |
Using hand mirrors, scrap book paper, old magazines, embellishments, mod podge and more, you can create these kitschy, fun, practical gifts in no time!
 | ||||
| Flower Embellishments that I bought at A.C. Moore! |
 | |
| This is what the bottle of Mod Podge looks like. |
•Mod Podge (Available at A.C. Moore or Michaels Arts and Crafts--Remember to use the 50% off coupons that are online or in the circulars!) I bought a large bottle but they come in much smaller containers if you don't want to commit to a large bottle.
•Foam applicator brush (I found mine in Walmart, although they definitely have them in the arts and crafts store.)
•Hand Mirrors (I found a whole bunch of all colors, shapes and sizes at my local Dollar Tree store)
•Old Magazines, Scrap book paper, paper dolls and/or free images that you can print off of the web (try google images).
•Embellishments such as the paper flowers posted in the image above, chipboard alphabet stickers, rhinestones, ribbon and whatever else you may have hanging around the house. (All of these materials can be found at the local craft supply store in their scrapbook department.)
•Hot Glue Gun and Glue Sticks (If you have never used a glue gun before, please be careful as it gets very hot.)
•Bucket of water and paper towels for rinsing and drying foam brush. (Make sure to wash your brush after you are done with the project as the Mod Podge will dry on it making it hard and never usable again if you fail to do this step.)
How to begin:
•Think about the person you are making the hand mirror for and begin tearing out expressive words and phrases that positively describe them. (Tearing creates feathered edges and is more beautiful than cut edges when you adhere the pieces on the mirror.)
•Tear up pieces of scrap book paper and images that you have collected.
•Use your foam applicator brush to apply the Mod Podge to an area directly on the back of the mirror (not the glass side). Then place your paper scrap, image or word on top of the applied Mod Podge. Now, dip the brush into the Mod Podge and paint the top of what you just applied. Mod Podge dries clear! Make sure you apply enough to give the underside and top a GOOD coat.
•Continue layering all of your words and images using the Mod Podge. Layering is the key!
•Allow the Mod Podge to dry and then apply your embellishments with the hot glue gun!
•Have fun! That is the most important part...and BE INSPIRED!
 |
| Detail of unfinished Hand Mirror |
Thursday, November 4, 2010
Chocolate Candy with Fruit and Nuts – Thrifty Gifty #2

An easy and yummy treat for the holidays is chocolate candy with fruit and nuts. I used to make this with my kids when they were smaller and it is easy and delicious. You can use what you have in your pantry and it is sure to come out wonderful. Package these little treats in small cupcake papers and then put them in a nice box or cellophane bag with a ribbon. Give them to all the special people on your list.

Ingredients:
Semi-sweet chocolate chips (12 oz.) Use a really good brand like Ghiradelli, for example.
Crisco
Dried fruit of your choice (cut into small pieces if it is large fruit) such as raisins, craisins, apricots – about a ¼ Cup (adjust according to your likes.)
Nuts (unsalted) such as pecans, walnuts, cashews, pistachios, etc. – about a ¼ Cup. (adjust according to your likes.)
Directions:
1. Melt chocolate chips in a double boiler with a teaspoon of Crisco.
2. Stir well and add dried fruit and nuts.
3. Stir again to incorporate fruit, nuts and chocolate.
4. Drop by teaspoonful onto waxed paper and let cool. (You can put this in the refrigerator to cool more quickly.)
5. Place each candy in a cupcake paper and package as directed above.
Other ideas:
· You can use mini-marshmallows and nuts, that is really yummy too.
Tuesday, November 2, 2010
Crock Pot Applesauce, easy, easy, easy!
Here is a great way to use up some old apples you might have lying around the house. If you don't have any old apples go to the food store and look in the reduced produce se ction. You can get apples for applesauce much cheaper this way!
• Bring apples home, peel them and chop them into 1 inch pieces. Add them to your crock pot.
•Put a small amount of water in the bottom of the crock pot. Add cinnamon to your taste (nutmeg is delicious, too.)
•Turn your crock pot to high for 2-3 hours (or low for a longer time.)
•When the apples are soft, either mash them or blend them into applesauce.
 ction. You can get apples for applesauce much cheaper this way!
• Bring apples home, peel them and chop them into 1 inch pieces. Add them to your crock pot.
•Put a small amount of water in the bottom of the crock pot. Add cinnamon to your taste (nutmeg is delicious, too.)
•Turn your crock pot to high for 2-3 hours (or low for a longer time.)
•When the apples are soft, either mash them or blend them into applesauce.
Monday, November 1, 2010
Becoming Blog Savvy

Blogging is a brand new arena in which my mom and I have started to explore. We intend to keep our creative juices flowing by constantly engaging in creative endeavors so we can continue to post ideas that you can be inspired by.
We have experienced a HUGE learning curve thus far as we are submerged in the blogging world and we would like to help you feel comfortable searching our blog without feeling overwhelmed by it.
Here are a couple of tips to help you along. For those of you who are experienced readers or bloggers, post a comment if you have something helpful to add!
1. Our blog is intended to inspire your creative side through tips, tutorials, photographs and more!
How to "Follow"
2. If you like our blog, you can become what is called a "FOLLOWER." A follower is someone who keeps track of what is going on with the blog. To "follow," find the word "follow" on the left hand side (side bar) of the screen under the words "Recent Readers/Followers." You will be prompted along and in the end, your name and photo, if you choose, will be on the right hand side of the page along with the "Recent Readers" who are also following publicly. You can also follow privately without anyone knowing that you are following us. This is an option as you are prompted along that you may select as well.
If you would like to follow our blog via e-mail, which means getting an e-mail each time we update our blog, type your e-mail address into the little box on the left hand side of our blog immediately at the top, labeled "Follow All About Being Inspired by E-mail!"
How to Read and Post Comments
3. We would love to hear your comments on our posts and so would our other readers! To post a comment, scroll down to the bottom of the post and look for the light grey box, then click on
"# comments."

We would really like to encourage posts because this is the only way we get feedback from our readers. With this information, it can help us tailor our posts to your liking!
Subscribe to a Feed
4. If you are really feeling bold, which I hope you are, click on "Subscribe in a Reader." This is called a feed. When you do this, you will get updates as new posts are created. Just click on the words "Subscribe in a Reader" on the upper left side of the page and follow the prompts.
Viewing Previous Entries
5. To view previous blog entries, locate the Blog Archive on the left side of the blog (you might have to scroll down a bit) and click on the black arrows to expand or close the lists. When you find something you want to read, click on the words and it will direct you to the page.
Be Bold in Exploring our Blog
6. For those of you who are unsure about clicking around on the blog, don't be because you can't do anything to mess up! Be encouraged in your clicking around and explore what All About Being Inspired has to share with you!
"Like"
7. If you use Facebook and are a "Like" button person, we have added those under each post. Feel free to "Like."
I hope this is an encouraging post for all of you who want to explore our blog in more depth!
BE INSPIRED!
Thrifty Gifties - Just in time for the Holidays!

Keep checking back with us for thrifty ideas to use as gifts for the holidays for the people you love. We all know that the economy is causing us to tighten our belts a bit but we still want to express our love for them and NOTHING SAYS LOVE more than something you made with your own hands. So get your hands ready...here come the ideas!


Decorated Soap-Thrifty Gifty #1
Here is a great idea that everyone seems to love. These make great gifts for the hostess or as a stocking stuffer. You can make a set of them, one for each season, as a beautiful gift. Grab a box of soap, any nice soap you like and get out your scrapbooking papers, glue, stickers, scissors, tape, rubber stamps and pads, ribbon and glitter. Now get creative!
1. Wrap the box of soap with nice paper.
2. Wrap the covered soap with ribbon in a nice pattern and tape in place using double-sided tape.
3. Decorate the box with stickers for specific themes or seasons.
4. Add glitter for some extra glitz!
Here are a few extra ideas to customize your soaps: Use Letter rubber stamps to personalize the soap, like a monogram. You can also use small cutouts from paper punches to add dimension. Use small dimensional flowers or leaves to make these soaps really special.
Don't forget to get your kids in on the action! This is something they can make for all of their special people - grandparents, bus drivers, lunch ladies, girl scout leaders, teachers, etc.
***Let us know what you think about this idea and send us a picture of what you did. We will try to post your creations!

Thrifty Gifties, just in time for the holidays!

Thrifty Gifty # 1, Decorated Soaps
Keep checking in to see some thrifty ideas for gifts for the upcoming holiday season or for just anytime at all. We will be regularly posting thrifty ideas for giftgiving during November and December.
We all know that the economy has caused us to tighten our belts a bit but we all want to express our love to those special people in our lives. NOTHING SAYS LOVE like something handmade. So get your hands ready...here come the ideas!
What you will need: Scrapbooking paper, ribbons, glue, double-sided tape, rubber stamps, glitter, stamp pad, small dimensional flowers or other decorations.
Directions:
1. Cover boxed soap with paper. Glue or tape sides closed.
2. Add ribbon to the box in a pleasing design.
3. Decorate with stickers, rubber stamps, small dimensional flowers, and glitter.
Some other ideas:
- Get the kids in on the action! Let them make soaps for all of their special people: grandparents, bus drivers, lunch ladies, girl scout leaders, etc.
- Use letter stamps to create a monogramed soap, very custom!
- Create a "set" of soaps, one for each season to give as a very special gift.
Post your thoughts and send us your pictures of your decorated soaps so we can post them for everyone else to see! Have fun!
Saturday, October 30, 2010
Creating a Favorite Things Birthday Basket

To make the basket, first establish how much you are willing to spend. Then, head out to find your big ticket items. (For this basket, the large ticket items were three gift certificates to favorite restaurants.) I created labels for each of the gift certificates, printed them out on my computer and adhered them to envelopes to make them more visually appealing in the basket.


To fill up the rest of the basket, think of little things that the person you are making it for really enjoys. I filled this one with Planters Peanuts, Twizzlers Black Licorice and a nice shirt.

Arrange the items in a container or basket that is seasonal or trendy, fill in the edges with crushed paper or tissue paper and wrap up with cellophane. Raffia and a bow are always a nice finishing touch.
The best thing about these "Favorite Things" Baskets is that they can be adapted for any one at any age and any celebration! When this gift is received, the person who is blessed with it will definitely know that you put some careful thought into their gift, which will be much appreciated!
BE INSPIRED!
Friday, October 29, 2010
No Costume, No Problem!

My lovely sister-in-law asked if I could face paint her for an event she was attending and of course, I said yes...how much fun is that? I have been face painting for many years now and learned how to do it from professional clowns.
After doing a bit of research and talking to her, we decided on a Princess face. She had a tutu tucked away in the closet and some fairy wings along with a crown to top it off. Oh yeah...and not to mention these awesome grey shoes with baby pink laces. With a black shirt and pants, this costume is cost-effective and fabulous!
You still have time to get the materials needed to create your own fantastic costume and face. Visit A.C. Moore and pick up a pack of face paints. I prefer to use Snazaroo brand face paint. It is in my personal collection and is FDA approved and hypo-allergenic. Remember that you can go onto www.acmoore.com and grab the featured coupon for that week. (Sometimes you can get up to 50% off of one item!) You will also need some brushes. If you are feeling oh so glittery, you can apply rhinestones with eyelash glue. Do some research on the internet for costume ideas and go for it!
I would love to hear all about your costumes and your adventures in putting them together!
Thank you, Jill for letting me put your picture on my blog!
BE INSPIRED!

Frightful Finger Cookies

After your little ghosts and goblins go trick-or-treating, how about serving up some of these Frightful Finger cookies to satisfy their sweet tooth? My mother-in-law who is an amazing cook has brought these cookies to life for the second year in a row...and boy, are they delicious! If these don't get you in the Halloween spirit, I don't know what will! Bloody cuticles, dirty brown nails and witchy green fingers never tasted so good!
Take a look at the recipe which was clipped out of a local magazine. Enjoy and BE INSPIRED!


Make it easy to follow our blog by clicking on "Subscribe in a Reader" to get updated feeds whenever we make a new post.
(The "Subscribe in a Reader" icon is on the right hand side of the blog and is featured as an orange square icon.)
Thursday, October 28, 2010
December Giveaway!
Make it easy to follow our blog by clicking on "Subscribe in a Reader" to get updated feeds whenever we make a new post.
(The "Subscribe in a Reader" icon is on the right hand side of the blog and is featured as an orange square icon.)
Tuesday, October 26, 2010
Some thoughts about decorating our homes for Fall,choosing paint colors and just in time before the holidays.

While having lunch with some of my friends in my neighborhood, we were discussing how we chose some of the colors in our home. As some of you already know, I am an artist. They suggested that I devote this article to explain how to use colors, from an artist’s perspective, in our homes. I mentioned that often when decorating, it is a good idea to select one item that has colors that speak to you. It is a very good way to chose colors that work and coordinate with each other. It might be a pretty rug or a mug painted in wonderful colors or it might be a print of a famous painting. Whatever you chose doesn’t matter. What matters is that the colors “feel right” to you.
Once you have chosen your particular “muse” you can then set about choosing how you would like to use those colors in your decorating scheme. Let’s use a rug as an example. Study that rug you liked so much and isolate the colors in it. Pull out colors for the walls. Perhaps those will be the pastel colors in the rug. Then study it some more and recognize the other colors you want to use in your house; for example, black, beige, white, and hits of red. The beige and white become your neutrals to use on such things as carpeting, wood trim, ceilings and other basic elements in your home. The black and red can be “accent” colors. Use those colors sparingly and in strategic places where they will pack a lot of punch in limited quantities.
Now back to the wall colors and our hypothetical rug. They were more pastel/mid-value colored, in shades of green, yellow and blue. In order to make these colors work, search for other places you can use these colors but in varying intensities of value (lightness or darkness of color.) For instance, the green that you chose for your kitchen will be used in many other places in the home and that green may be used in a lighter or darker shade. Be careful, however, to make sure that the greens are in the same or similar color family. What I mean by that is that if I am using a yellow-green, I am not using a darker blue-green and thinking it is going to match or co-ordinate. It is important to also spread the colors around different rooms in your house. Now, one might think that using the same colors becomes boring. Surprise! It does not! The trick to that is to use one predominant color in one room and all of the other colors as accents. Then in the next room, use another of the colors as the predominant color in the second room and use the other colors as accents. As you go through the rooms, keep changing it up and using a different color or variation of your colors in each room while accenting with the other colors. It makes the rooms in your house flow easily, one into another. Remember to keep using the neutrals that you chose in the beginning throughout your home in each room to provide continuity. The last thing I always try to remember is that while our homes are our canvas, we also live there. So sometimes there are things that are in our homes that really do not match at all! That is fine, too. The element of surprise can be very charming! The most important thing to remember is that our homes are meant to be lived in and enjoyed. The most important decorations of any home are the friends that frequent it!

How to be creative in your home this Fall :
· Find Fall items you like and put them around your home. Decorating your home seasonally can really give you a perk from season to season. You might even want to find an area you can devote to seasonal changes, like a bookshelf, etagere or a place in your kitchen where it will be noticed.
· Take a walk and notice the beautiful changing leaves that are beginning to fall. You can press them in a heavy book and they will be a sweet reminder of Fall when you find them in the Winter. You can even take some of those leaves, paste them on a piece of paper and bring them to your local color copy place and color copy them for use all year!
· Pick pinecones, large and small, and put them in a beautiful bowl with some cracked pieces of an old flowerpot. Add a few drops of scented oil to the cracked pottery and you have a lovely Fall potpourri. You can even add dried flower petals to add some softness to your arrangement.
· Visit a farm market and pick out some interesting gourds and pumpkins. Place them around your home to remind you of the season. Put some of the gourds in a large bowl on your table and enjoy their simple beauty. Or go apple picking! Put those red and yellow beauties in a bowl and let them be your decorations. Best thing yet...you can eat them when you need a sweet snack AND it is healthy, too!
Satisfy Your Sweet Tooth...BEFORE HALLOWEEN!
 |
| Chocolate Covered Pretzels |
With Halloween right around the corner, I was inspired to make some chocolate dipped pretzels with fall colored sprinkles and chocolate dipped marshmallows. This is the perfect dessert to share with friends as just a few bites can satisfy your sweet tooth without too much of an indulgence!
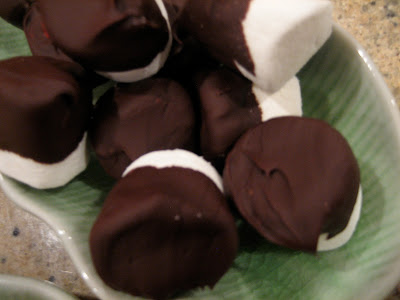 |
| Chocolate Covered Marshmallows |
The ingredients are easy and it takes no time at all to whip up a plate or two of these sweet and salty treats. These little confections are really crowd-pleasers!
Ingredients you need on hand:
•Pretzel rods (You can buy a big container of them at BJs or SAMS Club)
•A bag of marshmallows
•A bag of chocolate morsels (the ones you make chocolate chip cookies with)
•Crisco
•Sprinkles
•A baking sheet lined with waxed paper
•PAM Cooking Spray
What you need to do:
1. Line your baking sheet with waxed paper and spray a light coat of PAM Cooking Spray on the waxed paper (this is to prevent the marshmallows and pretzels from sticking to the sheet later on.)
2. In a double boiler, heat about 2 cups of chocolate morsels along with 1/4 cup of Crisco. Stir every now and then until you get a smooth, creamy, chocolate consistency without any lumps. Keep the burner on low so the chocolate stays warm while you are dipping.
3. Dip approximately half of the pretzel in the warm chocolate and then immediately roll in the sprinkles.
4. Lay out on the lined baking sheet.
5. Repeat the same process (#1-3) for the marshmallows. Sprinkles are optional here.
6. Once you are finished, put the baking sheet in the refrigerator and let cool.
Presentation:
When you are ready to serve your pretzels and marshmallows, find a beautiful dish and plate.
Note:
Feel free to dip your pretzels and marshmallows in nuts, crushed candy, etc.! The possibilities are endless! Please be careful while working on the stove with the double boiler as you can get hurt easily if you touch your hand or arm to it while dipping.
Enjoy and BE INSPIRED!

Saturday, October 23, 2010
Italy in the Fall
I will be married three years this coming November! My goodness how time flies. It seems to go even faster when you have children because you can not believe how quickly one goes from a helpless little infant to a toddling around little munchkin! Anyway, as I was browsing through my iPhotos, I thought that I would share some of my honeymoon pictures being that they were taken in the Fall (and that is the season we are focusing on right now in our blog). The special part of all of this is that they were all shot in Italy, where my husband and I spent nine amazing days celebrating our marriage!
I don't know anyone who isn't inspired by the Italian cathedrals with marble spilling all over the floors or the 15 foot tall David housed in such an unassuming museum! Just walking around taking photos of the vespas that lined the streets was enough eye candy for me not to mention the beautiful colors of gelato that peaked out of the cafe windows in Florence!
Knowing that Michelangelo or Caravaggio or a contemporary artist like David Smith had creations amongst us as we walked through Rome, Florence and Venice was just amazing.
If these pictures don't do anything other than make you smile or cause you to be your very own shutterbug looking for beautiful things in your personal world to capture in a photo and hang on your wall, then I know that they have inspired you!
Enjoy and BE INSPIRED!
 |
| A fountain in Rome. |
 |
| Vespas lining the streets. |
 |
| Gelato! Need I say more? |
 |
| The famous Trevi fountain. |
 |
| An outdoor restaurant in Rome. |
 |
| Dolce & Gabbana...designer everything in Italy! |
 |
| Vatican City, Rome. |
 |
| Ponte Vecchio. |
 |
| A gorgeous stained glass window in one of the many cathedrals! |
 | |
| The outdoor market in Florence. |
 |
| A coffee stop in San Gimignano. |
 |
| Just a lovely view in Tuscany. |
 |
| The Rialto Bridge, Venice. |
 |
| Doges Palace, Venice. |
 |
| Venice. |
Thursday, October 21, 2010
Delectable Collectibles

When it comes time to decorate the house for Fall, I head into my basement and bring up all of my "Fall" labeled bins and begin to dig right in! Taking out my mini collection of pumpkins that I have acquired over time, I wanted to think of a fun way to display them all.
All of them are very special to me as they each carry a memory from who they came from or where I bought them. As a few of them are pretty tiny, I thought it would be nice to do a grouping of them so they don't get lost in the mix of decorations spread throughout the house.
I decided to dedicate a whole shelf to my friendly bunch, raising some up on books and hiding others in nooks. I found a nice handmade doily, if you will, and I placed that under the grouping to first brighten up the area and bring some attention to it. Bringing up a couple old wooden boxes from my basement (that I probably picked up at a garage sale along the way) was a nice addition to my display as well.
I found that grouping similar items in one area, like I did to the pumpkins, creates a place that the eye can rest and the collection can be appreciated. Remember that a collection is a grouping of three or more similar items that you collected from different places at different times.
This is a great idea that you can be inspired by for Fall. What kind of collections do you have at home that are worthy of display? If you are so inspired to think ahead to the upcoming winter holiday seasons, think about your vintage glass ornament collection or your cookie cutter collection. How can you use these items in a beautiful winter display for the holidays?
If you have been inspired by any of these posts so far, please post a comment and/or picture of what you have done with your inspiration!
BE INSPIRED!
P.S. Coming soon..."Thrifty Gifties" (Making Handmade Gifts on a Budget)
Monday, October 18, 2010
Witches Hats, COAL BLACK CATS, Broom Stick Riders, Mice and Bats!

Last weekend when my husband, son and I went pumpkin picking, I just couldn't resist taking a picture of these clever black cats made out of pumpkins!
What a fun Halloween craft to make with your "sweetie!"
•Assemble two pumpkins on top of each other. (I would break the stem off of the top one and hot glue it to the larger base pumpkin.)
•Spray paint black!
•Add a black spray painted gourd alongside the base of the larger pumpkin with a touch of hot glue to represent the tail.
•Use construction paper for the ears, eyes and collar and bedazzle with sequins or glitter for that extra sparkle! Attach with the hot glue gun as well!
Create a whole family of these BLACK CATS for a spooky Halloween porch scene that your trick-or-treaters will love!
BE INSPIRED!
Subscribe to:
Posts (Atom)
LinkWithin
