The butter lamb is a Polish Easter Tradition that can either be sculpted by hand or formed in a mold. It is a beautiful centerpiece for any Easter table setting and reminds me of why we gather on Easter Sunday. It is because the Lamb of God, Jesus Christ, suffered for my sins and died on the cross.
Here, we are featuring the butter lamb that was freshly sculpted by my Mother-In-Law. She was kind enough to take pictures along the way so you can see the exact steps. A special thank you goes to Marlene's Aunt Sally who taught her the art of creating the butter lamb when she was a very young girl. Since then, it has been a Woods family tradition to have this adorable little lamb each year at the Easter table. What a wonderful tradition to start with your family.
INGREDIENTS:
• 2 Sticks of Butter
• Caraway seeds (for the nose)
• Peppercorns (for the eyes)
• Jelly Bean (for the mouth)
• Toothpicks (for making the fur)
• Knife and Spoon for sculpting
 |
| Step 1: Start with 2 sticks of butter side-by-side and cut as shown with knife. |
 |
| Step 2: Cut again as shown with knife |
|
|
 |
| Step 3: Arrange butter as shown and cut as shown with knife. |
 |
Step 4: Smooth over the base to join the two bottom pieces together.
Stack one piece of the first cut of butter from Step 1 on top of the base and on top of that,
stack the piece of butter that was just cut off on Step 3 to represent the head. |
|
|
|
|
|
|
|
 |
Step 5: With the remaining piece of butter that is off to the side,
cut off about 1/3 and place it in front of the head as shown. |
 |
| Step 6: With the back of a spoon, create a little tail. |
 |
| This is how your little lamb should look at this point. |
 |
| Step 8: With a knife, create a leg as shown. |
 |
| Step 9: Go ahead and make the back leg now. |
 |
| This is a detail of what your lamb should look like as of now. |
 |
Step 10: Begin to smooth over the butter with the spoon
to create seamless edges. |
 |
| Step 11: Sculpt a snout using the spoon. |
 |
Step 12: Adding butter remnant that was unused earlier,
apply to head and create ears. |
 |
| This is what your little lamb should look like up to this step. |
 |
| Here is another view of the lamb so far. |
 |
| Step 13: At this point, place your lamb in the refrigerator to harden a bit. |
 |
| Step 14: Using a toothpick, create little swirls that will be the lambs wool. |
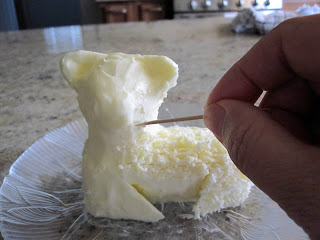 |
| Continue with the curls until the lamb is completely covered. |
 |
| Here is a photo of the lamb complete with its curls. |
 |
| Step 15: Add two peppercorns for eyes. |
 |
| Step 16: Add two caraway seeds for the nose. |
 |
| Step 17: Cut off a slice of jelly bean and add for the mouth. |
 |
| Final Step: Give the lamb a little purple bow using curling ribbon, add a handmade palm cross and dress with curly parsley! Keep refrigerated so it continues to stay hard and in shape. |
|
|
|
BE INSPIRED!


4 comments:
awesome post. Really enjoyed reading through this!
that is too cute, makes me want to go buy butter! thanks for partying at Type A!
wow!!
New GFC follower from the Weekend Gathering Hop
Karen
Mommy's Moments
http://www.avonbykaren.blogspot.com
Wow this is really neat. I'm not sure that I would be able to reproduce it as I am so not artistically inclined even with the step by step directions! Following you from Girl Talk and The Versatile Blogger post.
Post a Comment