Saturday, October 30, 2010

Creating a Favorite Things Birthday Basket


Here's a spark of inspiration for those of you who just aren't sure what to do for that special someone as their birthday rolls around again! I have discovered that these "Favorite Things" Birthday Baskets are fun to make and even better to receive!

To make the basket, first establish how much you are willing to spend. Then, head out to find your big ticket items. (For this basket, the large ticket items were three gift certificates to favorite restaurants.) I created labels for each of the gift certificates, printed them out on my computer and adhered them to envelopes to make them more visually appealing in the basket.


To fill up the rest of the basket, think of little things that the person you are making it for really enjoys. I filled this one with Planters Peanuts, Twizzlers Black Licorice and a nice shirt.


Arrange the items in a container or basket that is seasonal or trendy, fill in the edges with crushed paper or tissue paper and wrap up with cellophane. Raffia and a bow are always a nice finishing touch.

The best thing about these "Favorite Things" Baskets is that they can be adapted for any one at any age and any celebration! When this gift is received, the person who is blessed with it will definitely know that you put some careful thought into their gift, which will be much appreciated!

BE INSPIRED!

Friday, October 29, 2010

No Costume, No Problem!

Halloween is literally right around the corner and you may not have anything special prepared costume-wise. So, here is my solution...FACE PAINTING! Face Painting adds that special sparkle and flair of color to anything!

My lovely sister-in-law asked if I could face paint her for an event she was attending and of course, I said yes...how much fun is that? I have been face painting for many years now and learned how to do it from professional clowns.

After doing a bit of research and talking to her, we decided on a Princess face. She had a tutu tucked away in the closet and some fairy wings along with a crown to top it off. Oh yeah...and not to mention these awesome grey shoes with baby pink laces. With a black shirt and pants, this costume is cost-effective and fabulous!

You still have time to get the materials needed to create your own fantastic costume and face. Visit A.C. Moore and pick up a pack of face paints. I prefer to use Snazaroo brand face paint. It is in my personal collection and is FDA approved and hypo-allergenic. Remember that you can go onto www.acmoore.com and grab the featured coupon for that week. (Sometimes you can get up to 50% off of one item!) You will also need some brushes.  If you are feeling oh so glittery, you can apply rhinestones with eyelash glue. Do some research on the internet for costume ideas and go for it!

I would love to hear all about your costumes and your adventures in putting them together! 
Thank you, Jill for letting me put your picture on my blog!
BE INSPIRED!

Frightful Finger Cookies

  
After your little ghosts and goblins go trick-or-treating, how about serving up some of these Frightful Finger cookies to satisfy their sweet tooth? My mother-in-law who is an amazing cook has brought these cookies to life for the second year in a row...and boy, are they delicious! If these don't get you in the Halloween spirit, I don't know what will! Bloody cuticles, dirty brown nails and witchy green fingers never tasted so good!

Take a look at the recipe which was clipped out of a local magazine. Enjoy and BE INSPIRED!

Make it easy to follow our blog by clicking on "Subscribe in a Reader" to get updated feeds whenever we make a new post. 
(The "Subscribe in a Reader" icon is on the right hand side of the blog and is featured as an orange square icon.)

Thursday, October 28, 2010

December Giveaway!


Make it easy to follow our blog by clicking on "Subscribe in a Reader" to get updated feeds whenever we make a new post. 
(The "Subscribe in a Reader" icon is on the right hand side of the blog and is featured as an orange square icon.)

Tuesday, October 26, 2010

Some thoughts about decorating our homes for Fall,choosing paint colors and just in time before the holidays.


While having lunch with some of my friends in my neighborhood, we were discussing how we chose some of the colors in our home. As some of you already know, I am an artist. They suggested that I devote this article to explain how to use colors, from an artist’s perspective, in our homes. I mentioned that often when decorating, it is a good idea to select one item that has colors that speak to you. It is a very good way to chose colors that work and coordinate with each other. It might be a pretty rug or a mug painted in wonderful colors or it might be a print of a famous painting. Whatever you chose doesn’t matter. What matters is that the colors “feel right” to you.
Once you have chosen your particular “muse” you can then set about choosing how you would like to use those colors in your decorating scheme. Let’s use a rug as an example. Study that rug you liked so much and isolate the colors in it. Pull out colors for the walls. Perhaps those will be the pastel colors in the rug. Then study it some more and recognize the other colors you want to use in your house; for example, black, beige, white, and hits of red. The beige and white become your neutrals to use on such things as carpeting, wood trim, ceilings and other basic elements in your home. The black and red can be “accent” colors. Use those colors sparingly and in strategic places where they will pack a lot of punch in limited quantities.
Now back to the wall colors and our hypothetical rug. They were more pastel/mid-value colored, in shades of green, yellow and blue. In order to make these colors work, search for other places you can use these colors but in varying intensities of value (lightness or darkness of color.) For instance, the green that you chose for your kitchen will be used in many other places in the home and that green may be used in a lighter or darker shade. Be careful, however, to make sure that the greens are in the same or similar color family. What I mean by that is that if I am using a yellow-green, I am not using a darker blue-green and thinking it is going to match or co-ordinate. It is important to also spread the colors around different rooms in your house. Now, one might think that using the same colors becomes boring. Surprise! It does not! The trick to that is to use one predominant color in one room and all of the other colors as accents. Then in the next room, use another of the colors as the predominant color in the second room and use the other colors as accents. As you go through the rooms, keep changing it up and using a different color or variation of your colors in each room while accenting with the other colors. It makes the rooms in your house flow easily, one into another. Remember to keep using the neutrals that you chose in the beginning throughout your home in each room to provide continuity. The last thing I always try to remember is that while our homes are our canvas, we also live there. So sometimes there are things that are in our homes that really do not match at all! That is fine, too. The element of surprise can be very charming! The most important thing to remember is that our homes are meant to be lived in and enjoyed. The most important decorations of any home are the friends that frequent it!


How to be creative in your home this Fall :
· Find Fall items you like and put them around your home. Decorating your home seasonally can really give you a perk from season to season. You might even want to find an area you can devote to seasonal changes, like a bookshelf, etagere or a place in your kitchen where it will be noticed.
· Take a walk and notice the beautiful changing leaves that are beginning to fall. You can press them in a heavy book and they will be a sweet reminder of Fall when you find them in the Winter. You can even take some of those leaves, paste them on a piece of paper and bring them to your local color copy place and color copy them for use all year!
· Pick pinecones, large and small, and put them in a beautiful bowl with some cracked pieces of an old flowerpot. Add a few drops of scented oil to the cracked pottery and you have a lovely Fall potpourri. You can even add dried flower petals to add some softness to your arrangement.
· Visit a farm market and pick out some interesting gourds and pumpkins. Place them around your home to remind you of the season. Put some of the gourds in a large bowl on your table and enjoy their simple beauty. Or go apple picking! Put those red and yellow beauties in a bowl and let them be your decorations. Best thing yet...you can eat them when you need a sweet snack AND it is healthy, too!

Satisfy Your Sweet Tooth...BEFORE HALLOWEEN!

Chocolate Covered Pretzels


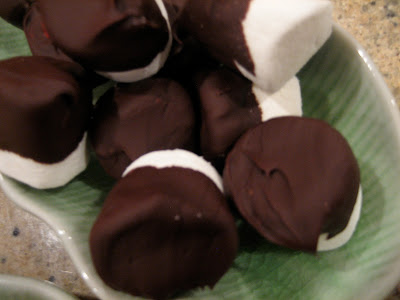
With Halloween right around the corner, I was inspired to make some chocolate dipped pretzels with fall colored sprinkles and chocolate dipped marshmallows. This is the perfect dessert to share with friends as just a few bites can satisfy your sweet tooth without too much of an indulgence!

Chocolate Covered Marshmallows

The ingredients are easy and it takes no time at all to whip up a plate or two of these sweet and salty treats. These little confections are really crowd-pleasers!

Ingredients you need on hand:
•Pretzel rods (You can buy a big container of them at BJs or SAMS Club)
•A bag of marshmallows
•A bag of chocolate morsels (the ones you make chocolate chip cookies with)
•Crisco
•Sprinkles
•A baking sheet lined with waxed paper
•PAM Cooking Spray

What you need to do:
1. Line your baking sheet with waxed paper and spray a light coat of PAM Cooking Spray on the waxed paper (this is to prevent the marshmallows and pretzels from sticking to the sheet later on.)
2. In a double boiler, heat about 2 cups of chocolate morsels along with 1/4 cup of Crisco. Stir every now and then until you get a smooth, creamy, chocolate consistency without any lumps. Keep the burner on low so the chocolate stays warm while you are dipping.
3. Dip approximately half of the pretzel in the warm chocolate and then immediately roll in the sprinkles.
4. Lay out on the lined baking sheet.
5. Repeat the same process (#1-3) for the marshmallows. Sprinkles are optional here.
6. Once you are finished, put the baking sheet in the refrigerator and let cool.

Presentation:
When you are ready to serve your pretzels and marshmallows, find a beautiful dish and plate.

Note:
Feel free to dip your pretzels and marshmallows in nuts, crushed candy, etc.! The possibilities are endless! Please be careful while working on the stove with the double boiler as you can get hurt easily if you touch your hand or arm to it while dipping.

Enjoy and BE INSPIRED!

Saturday, October 23, 2010

Italy in the Fall

I will be married three years this coming November! My goodness how time flies. It seems to go even faster when you have children because you can not believe how quickly one goes from a helpless little infant to a toddling around little munchkin! Anyway, as I was browsing through my iPhotos, I thought that I would share some of my honeymoon pictures being that they were taken in the Fall (and that is the season we are focusing on right now in our blog). The special part of all of this is that they were all shot in Italy, where my husband and I spent nine amazing days celebrating our marriage!

I don't know anyone who isn't inspired by the Italian cathedrals with marble spilling all over the floors or the 15 foot tall David housed in such an unassuming museum! Just walking around taking photos of the vespas that lined the streets was enough eye candy for me not to mention the beautiful colors of gelato that peaked out of the cafe windows in Florence!

Knowing that Michelangelo or Caravaggio or a contemporary artist like David Smith had creations amongst us as we walked through Rome, Florence and Venice was just amazing.

If these pictures don't do anything other than make you smile or cause you to be your very own shutterbug looking for beautiful things in your personal world to capture in a photo and hang on your wall, then I know that they have inspired you!

Enjoy and BE INSPIRED!

A fountain in Rome.

Vespas lining the streets.

Gelato! Need I say more?

The famous Trevi fountain.

An outdoor restaurant in Rome.

Dolce & Gabbana...designer everything in Italy!

Vatican City, Rome.

Ponte Vecchio.

A gorgeous stained glass window in one of the many cathedrals!

The outdoor market in Florence.

A coffee stop in San Gimignano.

Just a lovely view in Tuscany.

The Rialto Bridge, Venice.

Doges Palace, Venice.

Venice.

Thursday, October 21, 2010

Delectable Collectibles


When it comes time to decorate the house for Fall, I head into my basement and bring up all of my "Fall" labeled bins and begin to dig right in! Taking out my mini collection of pumpkins that I have acquired over time, I wanted to think of a fun way to display them all.

All of them are very special to me as they each carry a memory from who they came from or where I bought them. As a few of them are pretty tiny, I thought it would be nice to do a grouping of them so they don't get lost in the mix of decorations spread throughout the house.

I decided to dedicate a whole shelf to my friendly bunch, raising some up on books and hiding others in nooks. I found a nice handmade doily, if you will, and I placed that under the grouping to first brighten up the area and bring some attention to it. Bringing up a couple old wooden boxes from my basement (that I probably picked up at a garage sale along the way) was a nice addition to my display as well.

I found that grouping similar items in one area, like I did to the pumpkins, creates a place that the eye can rest and the collection can be appreciated. Remember that a collection is a grouping of three or more similar items that you collected from different places at different times.

This is a great idea that you can be inspired by for Fall. What kind of collections do you have at home that are worthy of display? If you are so inspired to think ahead to the upcoming winter holiday seasons, think about your vintage glass ornament collection or your cookie cutter collection. How can you use these items in a beautiful winter display for the holidays?

If you have been inspired by any of these posts so far, please post a comment and/or picture of what you have done with your inspiration!

BE INSPIRED!

P.S. Coming soon..."Thrifty Gifties" (Making Handmade Gifts on a Budget)

Monday, October 18, 2010

Witches Hats, COAL BLACK CATS, Broom Stick Riders, Mice and Bats!


Last weekend when my husband, son and I went pumpkin picking, I just couldn't resist taking a picture of these clever black cats made out of pumpkins!

What a fun Halloween craft to make with your "sweetie!"
•Assemble two pumpkins on top of each other. (I would break the stem off of the top one and hot glue it to the larger base pumpkin.)
•Spray paint black!
•Add a black spray painted gourd alongside the base of the larger pumpkin with a touch of hot glue to represent the tail.
•Use construction paper for the ears, eyes and collar and bedazzle with sequins or glitter for that extra sparkle! Attach with the hot glue gun as well!

Create a whole family of these BLACK CATS for a spooky Halloween porch scene that your trick-or-treaters will love!

BE INSPIRED!

Tuesday, October 12, 2010

74 Days and Counting! (How to Make Handmade Christmas Cards)

My Nanny with her handmade card and supplies.

My Grandmother (formally known as Nanny) has a knack for making the most beautiful handmade greeting cards. This has been her hobby for years now and we all anticipate a celebration where we will be the recipient of one of her special keepsakes. Really, they are so beautiful that they are frame-worthy!

Two weekends ago, I was the recipient of a stack of handmade Christmas Cards! What a JOY to receive such a bundle of creativity! So, naturally, I said "Nan, I have to blog about how you made these cards!"

Well, here I am and I am going to give you the secret ingredients to making them! This time of year, Michael's and A.C. Moore have plain seasonal cards on sale in their dollar racks. In there you can also find packs of stickers for approximately $1 and up, depending on what you are looking for. If you are "one of those" people who keep old greeting cards from years past, then dig them on out for this project!


Some of the supplies used in making the cards.

A sample of a finished card.

With new greeting cards from the dollar bin as your canvas, embellishments such as stickers, sticky rhinestones, small glittered flowers or whatever strikes your fancy, you can go to town creating your very own handmade treasures. Find use in the Christmas cards from seasons past and repurpose their sayings by cutting them out and gluing them onto your new creations.

Not only is this a favorable idea for handmade Christmas Cards but you can also make beautiful personalized place cards for a table setting. Add your guest's name with a sharpie marker, print out their name with a funky font from your computer or stamp on letters. What a fun keepsake!

As you hand out these cards, everyone will want to be on your NICE list!

BE INSPIRED!

Monday, October 11, 2010

Inspired by Changing Leaves and Pumpkins! Learn How to Make a Pumpkin Arrangement

Finished Pumpkin Arrangement
Yesterday, I hosted a small dinner for my parents and previous to their arrival my mom stopped at the craft store and picked up some fun supplies for making these adorable pumpkin arrangements! With a few bunches of silk flowers, leaves, some faux acorns and berries, we were able to hot glue a bounty of autumn goodness on top of a faux pumpkin.
 
Here is our scattered bunch of supplies! (Image A)

Start by building the base level of leaves. (Image B)

Gradually work up towards a peak at the top by adding flowers. (Image C)


In Image A, you will be able to see our supplies. All in all, we only used about three bunches of flowers to create two pumpkins (and a wreath).  Don't forget the hot glue gun and sticks, which are essential to creating this project as well as the base pumpkins. Nippers and scissors are necessary supplies for snipping the leaves and flower heads off of their wire stems.

To achieve a bountiful looking pumpkin, take a look at Image B and notice how the leaves were placed. They are draping over each other in a layered fashion. When we glued the leaves on, we were sure not to start at the stem. We moved out from the stem 2-3 inches and began the first layer of leaves there and built on top of that (gradually moving in toward the stem) so the leaves would be showing from underneath the flowers. 

As you can see in Image C, we added large flower heads in an inverted ice cream cone shape so there would be a triangular peak shape at the top of the arrangement. 

Lastly, we filled in the details with berries, acorns, and glittery leaves. 

Before calling your project complete, rotate the pumpkin around and take a look at it from all sides. Ask yourself if it looks full all around or is it flat in some areas and need to be made more full? The pumpkin should be able to show at any angle well! That is when you know your project is complete!

Here I am putting the finishing touches on my
pumpkin, which sits beautifully on my piano now!


Here is my mom in her "happy place!"


We hope you are as inspired as we were creating our Pumpkin Arrangements! This project is a lot of fun to do with someone else and only takes about a half hour to create!

PS: We are NOT EVER as serious as we look in these pictures. See the finished wreath picture that my mom created before her pumpkin.....this is more like it!

BE INSPIRED!

I am always looking for a goofy photo op
when it comes to taking pictures of my mom!

Sunday, October 10, 2010

GIVEAWAYS

Tweet About Us Giveaway!


Just dreaming about the little chocolate Easter bunnies and I was inspired to make this!
Feel free to download this below...I made it for you!

BE INSPIRED!

Monday, October 4, 2010

GRAB OUR BUTTON

Button


<a href="http://allaboutbeinginspired.blogspot.com"><img src="<a href="http://www.flickr.com/photos/56153724@N05/5267036987/" title="Button by vwoods64, on Flickr"><img src="http://farm6.static.flickr.com/5004/5267036987_98ba2c924f.jpg" width="100" height="100" alt="Button"/></a>

LinkWithin

Related Posts Plugin for WordPress, Blogger...